by Easy Motion Inc.
Owners page
Thank you for purchasing a Woodwiz® Splitter . We hope you find this page helpful. There are also some useful tips on our ' frequently asked questions' page.

For those who lost the original Instruction Booklet that comes with every Woodwiz® Splitter, don't despair! We have it here for you inAdobe Acrobat form:Woodwiz Instruction Booklet .pdf
Instructions For Proper Use
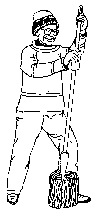
Always wear safety glasses, hearing protection, safety
shoes and gloves that grip well when splitting wood!
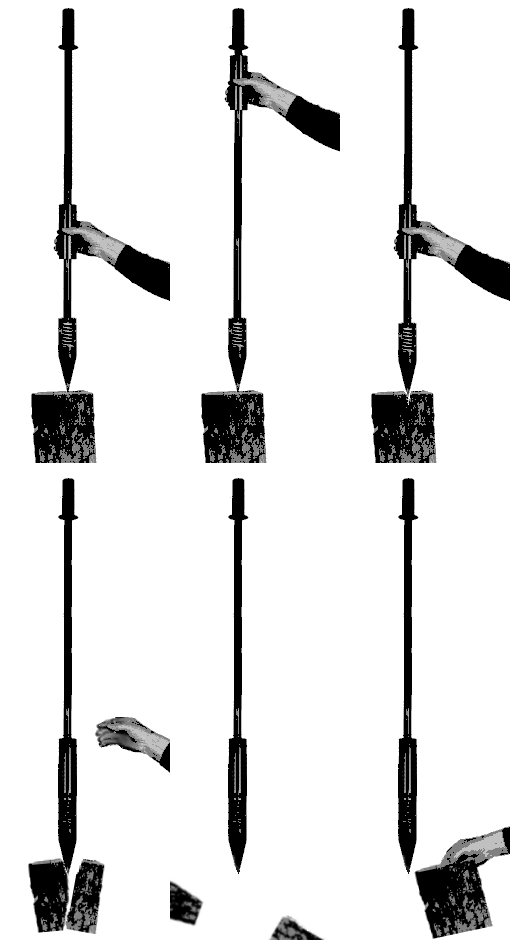
 Hold the
grip with one hand, the hammer with the other and place the splitting
tip on the end of an upright log.
- Keeping a firm hold on the grip, toss the hammer downward.
- Repeat until wood is split.
- It is not necessary to throw hard when the piece is almost completely split. In fact, ease up and you will find that the wood stays nicely together in a bundle for easy carrying.
- For safety reasons, always carry your Woodwiz® Splitter upright by the handle. This will prevent the sliding hammer from pinching skin.
Recommendations
Instructions For Repair (In the event you need to replace the handle or other part.) NOTE: If your splitter has come apart, please skip down to Reassembly.Placing a 2' X 2' plywood board under your log will help keep the tip sharp. Ease up on the last blow to help extend tool life. If tip is damaged, it may be sharpened with metal file. Keep directional grooves clean with a wire brush A heavy mass under the splitting board hastens splitting. Make a platform from solid concrete block sunk into the earth, or split on a concrete floor. Place tip in seasoning cracks. This works best for all wood, especially knots. Some logs are too big to split in half. Start at the outside splitting off smaller pieces and work around until log is completely split. HINT: Make a split in a log down the middle but don't go all the way through. When it is loose but still attached, lift out the tip and place it 90° catching both pieces. Throw down the hammer and you now have four pieces at once!
Tools needed: screwdriver. PLEASE USE EYE PROTECTION AND STEEL TOE SHOES!
1. Hold splitter upright, tap the hand grip off using the sliding hammer.
If all you need is a new hammer, simply remove hammer and replace with the new one. Place grip back on. Applying hairspray inside grip and on the handle will allow it to slide on and keep it in place when dry.2. Remove the hammer. If the handle has been bent such that the hammer is jammed, use a hacksaw to cut the handle off just above the hammer, then remove it.3. Remove the retaining ring.
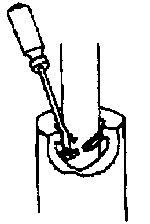
- Using a screwdriver, push one end of the retaining ring down into the well and continue around until the ring is about 1/8" below its original, seated position.
- Grab under an end of the ring and gently coax that end above the groove.
- Work around gently until the ring has been freed.
4. Hold the splitting tip with one hand and pull the handle free with the other hand.Ordering PartsParts needed: 50" length of 1/2" ID seam welded or gas pipe, 1" X 1/4" roll pin. These parts may be ordered from us, or may be purchased at your local hardware store.
1. Push roll pin out of damaged handle with drift punch and hammer. Be sure to support your work in a vice. Remove spring and retaining ring.Tools needed: 3/16" drift punch (or sawed off 16d nail), hammer, hacksaw,and 1/4" drill.
2. Drill 1/4" hole into end of new pipe centered 3/8"from that end.
3. Drive roll pin through so that ends protrude equally.
4. Slip spring then retaining ring down pipe and seat against new roll pin.
Tools needed: screwdriver
1. Assemble Handle if necessary (place Pocket Washer then Spring and then insert and tap Roll Pin into drilled hole) and place into the tip (roll pinned end first). Place the tip onto a stable upright log as a bench (this is about the perfect height to work from) and rest the handle on your shoulder.
2. Drop a new Retaining Ring down the handle and push it into the hole with screwdriver -one end first, working around gently until ring is seated or past the groove. Don't hold the tip because you may slip and poke yourself. Hold the handle instead.
3. Grab the tip with one hand, the handle with the other, and pull apart. If the ring was past the groove, it will click into place. Observe that the ring appears to be evenly seated all the way around. Reseat if needed.
4. If you feel the ring is properly seated, place the hammer back on and allow to fall once while holding the unit up off the floor. Hold with one hand at the top of the handle. Careful not to get your hand in the way!! This is a good test to see if the ring is seated. Watch your toes!
5. Place the grip back on. Use hairspray inside the grip and on the pipe to help slide it on. It will dry and hold like glue. (Special thanks to Michael Abbott- Atlantic Mine, MI for that suggestion.)
There are seven parts to every Woodwiz® Splitter. Please click here to use our printable order form.
We have a Handle assembly available complete with Pocket Washer, Spring and Roll Pin installed. You may simply insert it into a functioning Tip with new Retaining Ring, replace your hammer and grip and begin splitting again! A splitter worn from years of use may require replacement of more than the handle. You are welcome to email us for repair advice.
© Copyright 1995-2020, Easy Motion Inc.

